

Table of Contents
- Why Console Overheating Matters
- Console Overheating Symptoms to Watch For
- Step 1: Position Your Console for Optimal Airflow
- Step 2: How to Clean Dust Out of PS5 and Other Consoles
- Step 3: Monitor Ambient Room Temperature
- Step 4: Invest in Best Console Cooling Fans and Accessories
- Step 5: Enable Software-Based Cooling Management
- Step 6: Avoid Common Overheating Mistakes
Last Updated: August 6, 2026
Why Console Overheating Matters
Console overheating isn't just an inconvenience, it's a threat to your gaming investment. When your system runs too hot, internal components degrade faster, performance tanks, and you risk complete hardware failure. The good news: preventing console overheating is entirely manageable with the right approach.
Your console generates significant heat during gameplay. The GPU and CPU work overtime to render graphics and process data, and if that heat can't escape, temperatures climb rapidly. High temperatures trigger thermal throttling, where your system intentionally slows down to cool itself. That means lower frame rates, longer load times, and a frustrating gaming experience. Worse, sustained overheating can permanently damage your hardware, shortening its lifespan by years.
Console Overheating Symptoms to Watch For
Recognizing the early warning signs of console overheating lets you intervene before damage occurs. The most obvious symptom is excessive fan noise. When your console's internal fan kicks into overdrive, you'll hear a loud whirring or grinding sound, that's your system working hard to push hot air out. If the fan noise is constant during gameplay, your console is struggling with heat.
Random shutdowns are another critical indicator. Your console automatically powers off when internal temperatures exceed safe limits. If your system suddenly cuts out during a gaming session, overheating is the likely culprit. This is a protective mechanism, but it signals that your setup needs immediate adjustment.
Performance degradation often precedes shutdown. You might notice frame drops, stuttering, or longer load times even in games that normally run smoothly. This thermal throttling happens when your console reduces processing power to manage heat. If performance issues appear suddenly and worsen over time, suspect overheating.
Visual glitches, screen tearing, texture pop-in, or temporary freezing, can also indicate thermal stress. The GPU struggles to maintain stable performance when temperatures climb. Check your console's exterior temperature by carefully touching the case (not during active gameplay). If it's too hot to touch comfortably, your ambient temperature or ventilation setup needs adjustment.
Step 1: Position Your Console for Optimal Airflow
Console placement is the foundation of thermal management. Your device needs unrestricted airflow on all sides, especially around intake and exhaust ports. Never place your console in an enclosed entertainment cabinet, inside a closed shelf, or against a wall. These setups suffocate ventilation and trap hot air around the device.
Position your console in an open, well-ventilated space with at least 6 inches of clearance on all sides. For horizontal consoles, place them flat on a hard, heat-resistant surface like wood or metal. Avoid soft surfaces like carpet or fabric, which block air intake vents on the bottom. If your console sits on carpet, use a small stand or platform to elevate it and allow air to flow underneath.
Vertical orientation works for some consoles, but check your device's manual first. If vertical mounting is approved, ensure the stand is stable and doesn't obstruct exhaust ports. Point exhaust vents away from other electronics, as they expel hot air that could warm nearby devices.
Keep your console away from heat sources. Avoid placing it near windows in direct sunlight, next to radiators, or above heating vents. Even a few degrees of elevated ambient temperature can push your console closer to thermal limits. If your room gets warm during summer, consider relocating your console to a cooler area or improving room cooling.
Step 2: How to Clean Dust Out of PS5 and Other Consoles
Dust buildup is the primary cause of console overheating. Dust accumulates on the heatsink and internal fans, insulating components and blocking airflow. Over time, this debris layer prevents efficient heat dissipation. Regular cleaning removes this thermal barrier and restores your console's cooling efficiency.
What You'll Need
- Compressed air canister (electronics-grade)
- Soft-bristled brush or old toothbrush
- Microfiber cloth
- Isopropyl alcohol (optional, for stubborn dust)
- Phillips head screwdriver (if your console allows user-accessible dust filters)
- Well-lit workspace
- Anti-static wrist strap (recommended but optional)
Cleaning Process
Step 1: Power down and unplug. Turn off your console completely and wait 10 minutes for internal components to cool. Unplug the power cable. Never attempt internal cleaning while powered on or plugged in.
Step 2: Remove the side panel or dust cover. Most modern consoles have removable panels or dust filters. Check your console's manual for specific instructions. Some devices have a simple slide-off cover, while others require unscrewing a panel. Take photos during disassembly so you remember how to reassemble everything.
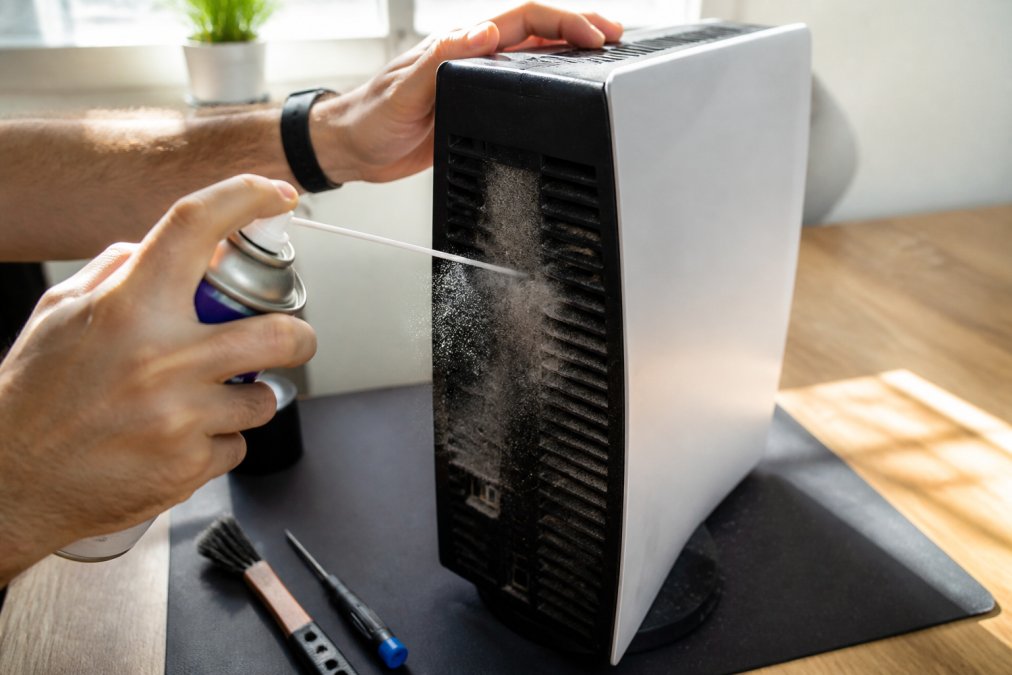
Step 3: Use compressed air to dislodge dust. Hold the compressed air canister upright and use short bursts, not continuous spraying. Direct air at the heatsink fins, internal fans, and dust filters. Keep the canister 4-6 inches away from components. Compressed air removes loose dust effectively without touching delicate parts.
Step 4: Brush away stubborn debris. If dust clings to the heatsink or fan blades, use a soft brush to gently loosen it. Brush in one direction to avoid redistributing dust deeper into the device. A soft toothbrush works well for tight spaces. Be gentle, fan blades are delicate.
Step 5: Wipe surfaces with a microfiber cloth. After compressed air and brushing, use a dry microfiber cloth to wipe down accessible surfaces. This removes any remaining dust particles. Avoid using paper towels, which can leave fibers behind.
Step 6: Reassemble and test. Replace the dust filter or panel exactly as it came off. Power on your console and listen for the fan. It should run quieter than before, and thermal performance will improve noticeably. Monitor temperatures during your next gaming session.
Repeat this cleaning process every 3-6 months, depending on your environment. Dusty rooms require more frequent cleaning. If you have pets or live in a dry climate, dust accumulates faster.
Step 3: Monitor Ambient Room Temperature
Your console can only cool itself relative to the surrounding air. If your room temperature is already high, your console starts at a thermal disadvantage. Ambient temperature directly affects how efficiently your device can shed heat.
Maintain your gaming space at 65-72°F for optimal console performance. This gives your cooling system plenty of thermal headroom. If your room regularly exceeds 75°F, your console will run hotter even with perfect internal cooling. In summer months, this becomes critical.
Use air conditioning to keep your gaming area cool. If central AC isn't available, a portable air conditioner or fan helps manage room temperature. Even a simple box fan pointed at your console setup improves airflow significantly. The goal is to create movement in the air around your device, stagnant air traps heat.
Monitor your room's temperature during extended gaming sessions. If you notice your console getting hot or the fan ramping up, check your thermostat. A room temperature increase of just 5 degrees can push your console into thermal throttling territory. Consider gaming during cooler times of day or improving your room's cooling capacity if overheating persists despite other interventions.
Step 4: Invest in Best Console Cooling Fans and Accessories
External cooling fans supplement your console's built-in cooling system. These devices blow air directly at your console, improving heat dissipation and reducing internal fan strain. Quality cooling accessories are particularly valuable if your room temperature runs warm or if you game for extended sessions.
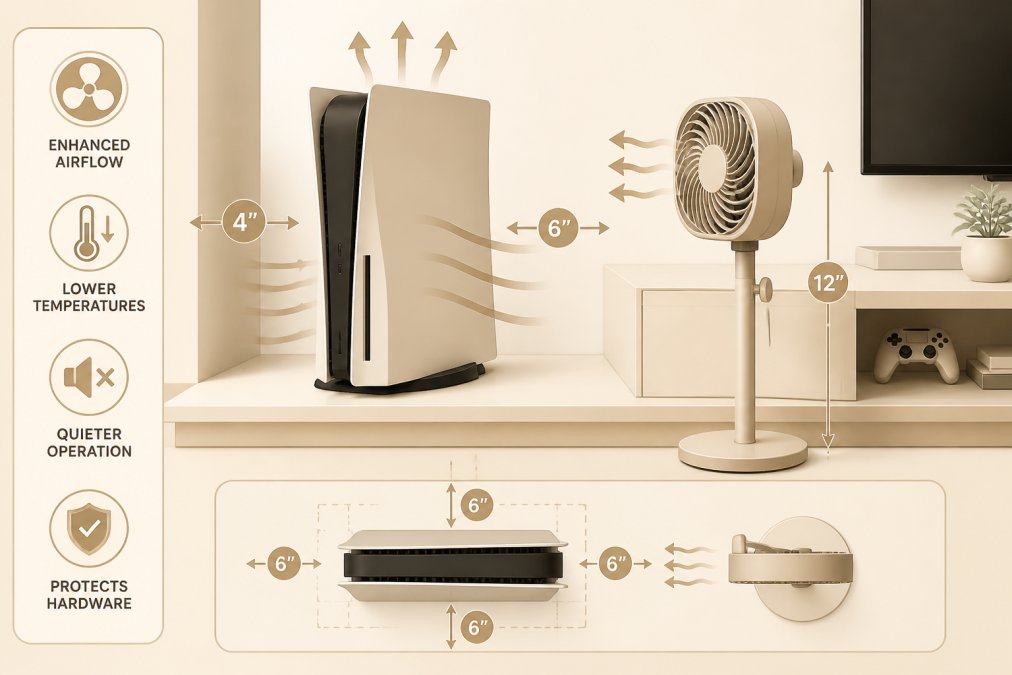
Standalone cooling fans mount near your console and draw air across its exterior. Look for models with adjustable speed and quiet operation. USB-powered fans are convenient and don't require additional outlets. Some premium models include temperature sensors that automatically adjust fan speed based on your console's heat output.
Vertical stands with integrated cooling offer another option. These stands hold your console upright while built-in fans blow air directly at the device. They're particularly effective for horizontal-to-vertical conversions and provide stable, elevated placement.
Thermal paste replacement is a more advanced option for users comfortable with hardware modification. The thermal paste between your CPU/GPU and heatsink degrades over time, reducing heat transfer efficiency. Replacing it with high-quality thermal paste can improve cooling by 5-10 degrees Celsius. However, this requires disassembling your console and voiding the warranty. Only attempt this if you're experienced with electronics and understand the risks.
The Techie Den offers a curated selection of cooling accessories designed for popular consoles. Quality matters here, cheap fans often run loud and provide minimal cooling benefit. Investing in a reliable cooling solution pays dividends in console longevity and performance stability.
Step 5: Enable Software-Based Cooling Management
Many modern consoles include software settings that help manage thermal output. These settings prioritize cooling over maximum performance, which is a worthwhile trade-off for system stability.
Check your console's settings menu for performance modes. Many devices offer options like "Performance Mode" (prioritizes frame rate) and "Fidelity Mode" (prioritizes graphics quality). If your console runs hot, switching to a balanced mode or enabling any available cooling-focused setting reduces thermal load. Your games will still look great, and you'll gain system stability.
Some consoles allow fan curve adjustments in developer settings or advanced menus. Enabling aggressive fan profiles at lower temperatures prevents your console from ever reaching dangerous heat levels. The trade-off is audible fan noise, but consistent cooling beats occasional shutdowns.
Check for firmware updates regularly. Manufacturers often release updates that improve thermal management and efficiency. Newer firmware may optimize how your console allocates processing power, reducing unnecessary heat generation.
Monitor your console's system temperature if your device displays it. This real-time feedback helps you understand how different games and settings affect thermal output. If you notice specific games causing excessive heat, adjust their graphics settings or take breaks during extended play sessions.
Step 6: Avoid Common Overheating Mistakes
The most damaging mistake is placing your console in an enclosed space. Even a well-ventilated cabinet with open sides restricts airflow compared to completely open placement. Enclosed entertainment centers look clean and organized, but they're thermal death traps for consoles. If you must use a cabinet, remove the back panel entirely and ensure at least 12 inches of clearance around the console.
Never block exhaust ports or vents with objects. Some gamers accidentally place controllers, cables, or other items against their console's vents during storage. This seems harmless but creates a dust trap and blocks critical airflow. Keep a 6-inch perimeter around your console completely clear.
Avoid stacking items on top of your console. Even lightweight items like controllers or magazines insulate the top surface and prevent heat from escaping. Treat the top of your console as off-limits for storage.
Don't ignore early warning signs. If your console's fan becomes audibly louder, that's your system telling you something needs adjustment. Address the problem immediately rather than waiting for shutdowns or performance degradation. Early intervention prevents permanent damage.
Resist the temptation to cover vents with dust filters or cloth. While this might seem like it would catch dust, it actually blocks airflow and worsens overheating. Your console's built-in dust management is sufficient if you clean regularly.
Finally, avoid pushing your console to its thermal limits consistently. Just because your device can run at maximum settings doesn't mean it should run there 24/7. Give your console breaks during extended gaming sessions. Even 15-20 minute cooling periods between gaming marathons extend hardware lifespan significantly.
Keeping your console cool isn't complicated, but it requires consistent attention. The steps outlined here, proper placement, regular cleaning, temperature monitoring, and smart accessory choices, address every major cause of overheating. The Techie Den offers premium cooling solutions and accessories designed specifically for popular gaming consoles. Start with the fundamentals: position your console in open air, clean dust regularly, and monitor your room temperature. Add external cooling if needed. These measures will keep your system running reliably for years.
| Prevention Method | Effort Level | Cooling Impact | Frequency |
|---|---|---|---|
| Optimal console placement | Low | High | One-time |
| Dust cleaning | Low | High | Every 3-6 months |
| Room temperature control | Medium | Medium | Ongoing |
| External cooling fan | Medium | Medium | One-time purchase |
| Software optimization | Low | Low | One-time setup |
| Thermal paste replacement | High | Medium | Every 2-3 years |
Frequently Asked Questions
What are the main signs my console is overheating?
Common console overheating symptoms include unexpected shutdowns during gameplay, loud fan noise that increases over time, visible thermal throttling where performance drops mid-game, and the console body feeling extremely hot to the touch. If you notice these signs, stop playing immediately and allow the device to cool. Persistent overheating can cause permanent hardware damage and device failure.
How do I clean dust out of PS5 and other gaming consoles safely?
Use compressed air to blow dust from external vents and intake ports while the console is powered off and unplugged. Hold the can upright and use short bursts at a 45-degree angle. For stubborn debris, use a soft brush alongside the compressed air. Never use a vacuum cleaner, as static electricity can damage components. If you're uncomfortable opening the device, external cleaning alone often prevents most overheating issues.
Do I need to buy external cooling fans, or is proper placement enough?
Proper console placement with adequate ventilation prevents most overheating issues. However, if your room temperature stays above 75°F or you game for extended sessions, external cooling fans provide additional thermal management. Look for fans designed specifically for your console model, they mount safely without voiding warranties when installed correctly. External cooling is especially valuable in warmer climates or during summer months.
Will cleaning my console void the warranty?
External cleaning with compressed air typically does not void warranties, as you're not opening the device. However, disassembling your console to access internal components may void coverage depending on your manufacturer and warranty terms. Check your specific warranty documentation before opening the device. Many manufacturers allow external maintenance but restrict internal repairs. When in doubt, contact customer support before performing any internal work.
This article was written using GrandRanker


